
Contents
What Is EQ or Equalization In Music?
EQ or Equalization in music is the process of altering the balance of an entire sounds frequencies. Equalization is a vital process in mixing, think of it as the chisel of the sound world – you are the sculptor that can use it to shape your sound anyway you like.
How Do I Use EQ?
EQ is mostly used in a corrective manner by subtracting unwanted frequencies, to clean up your audio signal. You can also use it to boost areas of importance, to make it shine more & increase the clarity of that area.
For instance, if you want more high register sound in your hats, you can boost the high range frequencies, using your EQ, and it will accentuate this area.
While EQ’s are quite basic in terms of their functionality, their simplicity comes with a world of training and adjusting, to be able to utilize correctly. For the sake of this article, we’ll be assuming you’re using a Digital EQ, instead of a rack unit, or a 500 series EQ.
Let’s start off by running through the basics, and we’ll get on to more advanced techniques later on.
Basic EQ Controls

No matter what kind of EQ you have, all of them will have the same basic features, and will do the same kind of stuff.
At it’s core, Equalization is the use of very precise filtering and, a lot of the basics in filtering carry over to EQ.
The main controls of your EQ are:
- Filter Type
- Slope
- Q
- Gain
Filter Type determines the shape of your EQ band.
The most simple types of filters are High-Pass and Low-Pass filters. A High-Pass filter will only leave the frequencies above your EQ band, while a Low-Pass filter will leave everything below EQ band. These can also be referred to as low cut and high cut filters.
We’ll talk about filters more in-depth in a little bit, but first let’s finish covering the rest of the controls.
Slope determines how aggressively the sound you’re affecting, is attenuated. Slope is mostly associated with High Pass and Low Pass filters. Slope is measured in dB/octave. The higher the number, the steeper the drop off around the corner frequency of the filter.
Q or quality factor, is essentially the slope, but for bell filters. Q controls how wide or small your EQ boost or cut is. Values below 1 will give you wider EQ curves, values above 1 will produce more precise boosts or cuts.
Lastly, Gain is the amount of boost or cut, you want to apply to your EQ band. Positive Gain values will boost your frequencies at a certain point, while negative Gain values will cut a certain amount of dB from your EQ band.
Instrument Frequency Ranges
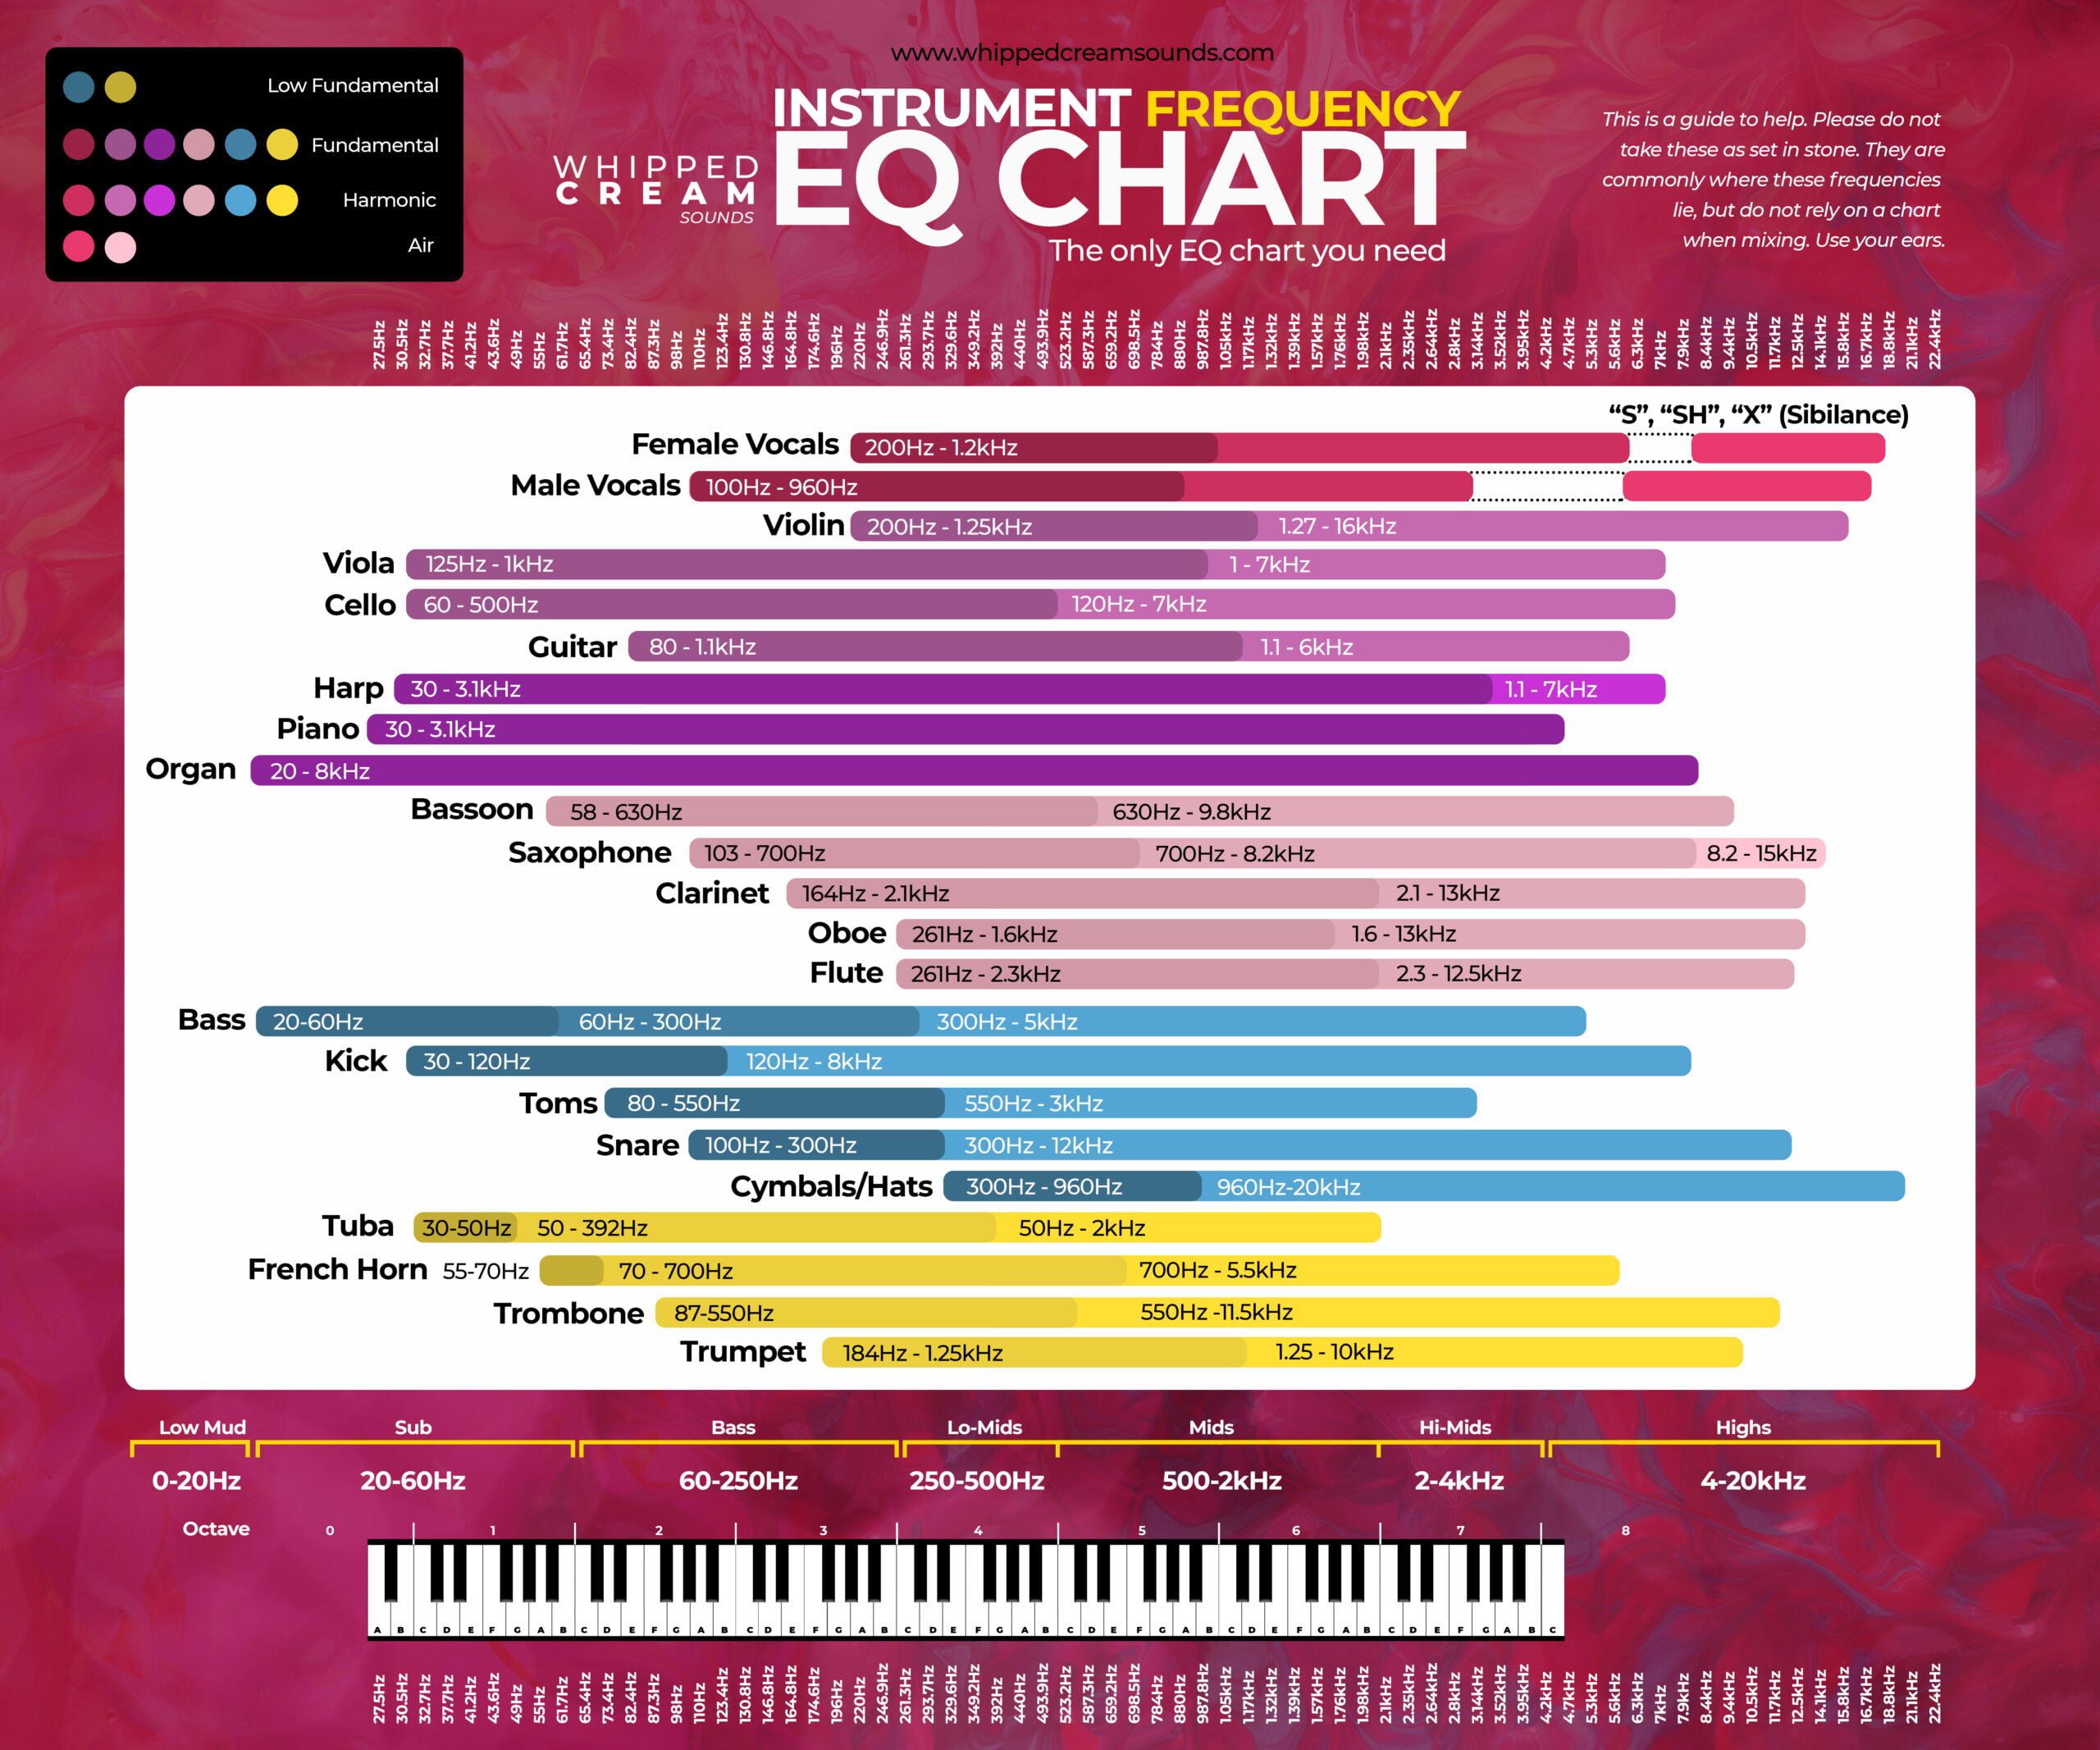
| Sub | 20 – 60Hz |
| Bass | 60 – 250Hz |
| Low Mids | 250Hz – 1.5kHz |
| High Mids | 1.5 – 4kHz |
| Presence | 4 – 7kHz |
| Brilliance | 7 – 20kHz |
While you should always do your EQ on a case-by-case basis, adapting to each new audio file, there are certain frequencies, that instruments will naturally take up.
For example, bass frequencies are below the 60-250 Hz mark, with your subs taking up the 20-60Hz range.
Drums tend to take up the most of your frequency spectrum, with Kick drums residing around the same frequencies, as your Bass. These are usually 80-200Hz for the fundamental.
In contrast, your cymbals, hi-hats and other percussive elements can take up all the way to 20kHz and up, way into the presence range.
Piano ranges from 27Hz (A1) – 4.1kHz (C8)
Vocals is another bag of hard-to-categorize frequency response. The fundamentals of your vocals tend to reside around the 100-400Hz mark, but most of the quality of your vocals is above that. By quality we mean all the sparkliness and clarity you usually want in a vocal, which comes from frequency ranges above 2kHz.
Synths can take up the frequency spectrum all the way from 0-40kHz, way above the thresholds of human hearing. Synthesizers’ versatility means that you’ll usually fit them in with your track as needed. A good synth can add to your track and fill out some holes in your frequency spectrum.
That’s exactly why synth pads and leads are so popular. Making an appropriate synth sound will instantly make your mixes warmer and more full.
As with everything else however, these are just guidelines and if you want your bass to start at 250Hz, you can (we can’t guarantee good results though).
Check out our how to compress bass guide for more info on getting a thick, tight low end.
Monitors, Multiple Listening Devices & Their Importance in Accurate EQ
It is ideal for the audio monitor to have a flat response curve across the whole spectrum so that it is as transparent as possible. However, there is no substitute for listening to different sound systems to determine if the monitor is perfect for your needs.
Listen to the recording in a car, on a cheap CD player, on your home stereo, and anywhere else you think that might be useful for getting a new perspective on your mixing, as well as getting the tricky low end right, is one of the most important aspects of mixing.
It is often the case that low sounds are harder to hear at low volumes. This is why it can be useful to use a spectrum analyzer in order to determine what sounds make up a particular sound and how to EQ accordingly.
Listed below are some guidelines of what frequency should be applied to what. They are only guidelines and are meant to be used as such.
In compiling them, I consulted several sources as well as my own experiences and experiments. I do not believe that EQ is a hard and fast rule. When professorial sound engineers declare what should be boosted or cut, they sometimes discredit amateurs and hobbyists. However, it really depends on the source material and overall mix as a whole.
A lot of EQ advice is offered to help create a “professional sound” and the idea is to get a sound that is similar to all the other music on the radio.
Pros benefit from skilled arrangements, professional musicians and vocalists, and quality gear throughout the entire signal chain. You don’t always have these, so take this advice with a grain of salt.
Although that is fine, I would strongly suggest you try your best to get the sound you are looking for.
Remember: equalization is not a magic bullet. If the sound is bad to start with, EQ is not going to fix it. You cannot boost what is not there.
Advanced EQ Controls
So now with that out of the way, let’s move onto some more advanced EQ control.
Mid/Side

By default, most audio processing works either in mono, or in stereo. Any processing that is applied would affect the whole mono/stereo signal of the audio track.
A processing tool, like an EQ with a mid/side mode, will essentially split your frequency spectrum into two. The Mid channel and the Side channel.
The Mid channel is the center of a stereo image. When the Mid channel is boosted, the sound becomes more centered. Imagine it as the mono element in Mid/Side.
The Side channel is the edges of a stereo image. When the Side channel is boosted, the sound becomes wider and more spacious.
Mid/Side can be used as both a mixing and mastering tool, and is extremely good for cleaning up mix elements, giving pads air, adding width to sounds & more.
Mid/Side for Mixing
On any instrument recorded in stereo, a high frequency EQ boost on just the side channel makes the ‘wider’ elements sound brighter. Same goes with drum overheads – slight volume boosts on the side channels can enhance your room sound and your stereo image.
In contrast, you might want to automate a lead synth channel, to be more present in the chorus of your track. A volume boost in the mid channel of your EQ, automated to turn on when your chorus begins, will make the audio more forward and present in the mix.
Mid/Side is also great for use on pads, to give them an extra wide dimension and fill out space in the stereo field of your mix.
Mid/Side for Mastering
If you’re suffering from a muddy mix, you might have too much low-end information in your side channels. If your overall mix is muddy, reducing the low frequencies on your side channel, with a high-pass filter, will help to clean up any unwanted low-end information.
You can also add presence to the mix by boosting the mid channel with a high-shelf filter anywhere above 8,000 Hz.
Another thing to try out is balancing the tonal spectrum by boosting, or attenuating different areas of the mix. Use a broad bell filter on the mid channel and make subtle level changes. Try to achieve equal perceived loudness levels across the frequency spectrum.
L/R
At it’s core, L/R or Left and Right channel EQ, is quite similar to Mid/Side. Where Mid/Side EQ affects either the entire middle or side stereo signal, L/R only deals with the sounds that are panned directly left or right.
If you imagine a stereo signal in your DAW, is usually represented as two waveforms stacked on top of each other. These are the separate L/R channels. L/R EQ is a way to process them independently from one another.
An instance where you would use L/R instead of Mid/Side, would be for sounds that are automated and panning from hard left to hard right.
Dynamic EQ

Dynamic EQ is a great tool to give you that subtle boost of quality in your mixes.
Dynamic EQ is very similar to a compressor. It’s a processing unit that responds to the signal coming in, and reduces the gain (or increases, depending on how you have it setup), based on the parameters you’ve set. Unlike usual compression units, Multiband Compressors have the ability to apply different compression to different frequency ranges, based ib giw tiy set your crossovers.
Dynamic EQ’s are very similar to Multiband compressors, except replacing the crossovers with standard EQ filter shapes. Unlike a static EQ, which will shape your sound all the time, a Dynamic EQ will respond to the frequencies in your signal.
This is extremely useful for unwanted resonant frequencies. You can set the dynamic EQ to react when that frequency gets too loud, instead of outright removing it. This allows you to keep some of that resonant information that you want in your audio signal, but reduces it enough so it doesn’t grate on the ears.
Much like a compressor, you get additional Attack and Release settings. A Dynamic EQ will let you attenuate the frequencies of your signal, in real time with your sound. This is great when you don’t want to change the overall spectral balance of your signal, but want to accentuate certain frequency bands.
For example, if your track is lacking brightness and presence, a dynamic EQ is the perfect tool. With a static EQ, you’re able to push the overall frequency balance towards the high end of the frequency spectrum. This affects the balance of your sound, and is not what you want, when affecting your entire mix.
Instead, use a Dynamic EQ with a high-shelf filter. Dial in some subtle gain, use more gain for more brightness. After dialing in your dynamic response, and getting your EQ working, you’ll have a much clearer and present high end, without introducing any harshness to your mix.
The Different EQ Filter Types And What They Do
There are three main filter types when using EQ. We’ll explain them in further detail here, what they look like, & how they affect the sound.
When you open a parametric EQ (usually your stock DAW EQ), you’ll notice it’s divided into 8 bands. These 8 bands consist of: low cut, bell (or notch) 1 – 7 & a high cut. You can change these bands into anything you like in the digital world, but they used to be set out like this on original hardware parametric EQ units.
Low Cut Filter

A low Cut filter, (also known as a High-Pass filter), is a type of filter that removes frequencies below a certain threshold in your audio signal. Let’s say you want to get rid of the muddiness at the low end. For this, you’d most likely utilize a low cut filter shape.
Usually low cuts are set up at around 20-150Hz, but larger cuts are useful, in a mid/side context, as well as other sound design possibilities.
Typically, most filters have slopes. Slopes are essentially the amount of attenuation your filter is doing, the lower it goes. Slopes are measured in dB per octave. A 12dB slope will mean that signal an octave lower will be attenuated by -12dB.
For example, a high filter slope setting, will mean you’re pretty much “brickwalling” the frequencies below your cutoff point. A smaller slope setting will mean a more gradual attenuation, the lower down the frequency spectrum you go.
TIP: Low cuts are best for cleaning up mud as well as removing bass elements. Try cutting the bottom end of a drum loop, and replacing it with a different kick drum.
High Cut Filter

A High Cut filter (otherwise known as a low-pass filter) is the opposite of a low cut. Where a low cut would remove all the frequencies below the cutoff threshold, a High Cut will remove everything above.
Typically a high cut filter is used to remove harshness at the top end of a sound, but it can also be used as an effect.
Sometimes, automating the high cut of your EQ in time with a drop in the song can create amazing contrast in your music. Next time you’re producing, try using a high-cut to create tension.
Bell Filter

A bell filter (or band-pass filter), is the one you’ll be using the most when doing any kind of corrective EQ. Whether you boost or cut, bell filters can be used along the entire range of frequencies.
Most modern software EQ’s, such as Fabfilter’s Pro-Q3 use a Bell filter as the default filter shape. A bell filter is amazing for a cheeky cut or boost in your frequency range, which makes it perfect for corrective EQ.
Where a high cut and low cut filter has slope control, Bell filters have Q, or, quality factor. Q basically controls the width of your bell shape. a low Q will mean a sharper filter shape, while a higher Q setting will widen your band.
Notch Filter

Lastly, the notch filter. Also known as a band-stop or Band Reject Filter, it is essentially the scalpel of all filter shapes.
A notch filter is essentially a bell filter, with a very high Q setting, making the attenuation range like a lazer (under 10Hz).
Where most other filter types attenuate a wider range of frequencies, a notch filter is designed to precisely, and accurately remove a certain frequency. It leaves everything above and below the cutoff point untouched, while sharply attenuating the selected frequency out of existence.
For this reason, notch filters are most widely utilized in reducing Resonance and taming unwanted frequencies.
TIP: An EQ plugin with a band-solo function is extremely helpful when working with notch filters.
Shelf Filter


Shelf filters are the exact opposite of a high and low cut. Shelving filters boost frequencies above a certain cutoff point, unlike cuts, which cut these frequencies. In the context of your audio spectrum, shelf filters should be used more conservatively.
As with all boosts in any frequency band, your original signal’s gain structure can be ruined very fast.
We like to use shelf filters in dynamic mode. Attenuating your high frequencies dynamically, above a certain threshold can serve to fill out your top end. Furthermore, a dynamic high shelf on your side channel can create a lot of pleasurable excitement for your high frequencies.
How Should I Use EQ?
Using EQ really depends on the result you want. You can use EQ to sculpt, sound design, or even carve out space for your sounds to sit in. Here we’ll go over the most common uses.
Carving Space For Your Sound
One of the more popular uses for EQ, carving space in your mix is an essential part to getting a balanced instrumentation.
Let’s say you have a Bass and a Kick channel playing at the same time. Because they occupy the same frequency spectrum, they will clash. Putting these two frequencies together, will interfere with each other and double the amplitude, or volume of your audio signal.
After you’ve gotten your levels all nice and balanced, if your kick hits the same time as the bass, the levels will go out of wack. So obviously you need to do something about that.
To combat this constructive interference, we can use an EQ, to carve out space in one channel, for another one.
Say your main bass fundamental is at 80Hz, and your kick is at 100Hz. Since these frequencies are close together, they’ll interfere with each other. Now you have two options: either you carve out space for the kick in your bass signal, or the other way around.
Which one you choose will depend on the music, and what part you’d like bring more focus to. Let’s say it’s the kick in this case.
Using a bell filter, attenuate the 100Hz range on your bass signal, so that there are less frequencies of the same frequencies in your bass. This will carve a space out of the frequency range for it to sit in.
FabFilter’s Pro-Q3 has an great feature that lets you overlay one channel’s EQ over another, and instantly highlights the frequency range with clashing frequencies. This makes the whole process of carving out space, much easier and faster, so, for any precise EQ work, we recommend Pro-Q3
TIP: Don’t cut too much out of your signal. If you remove too much from your bass sound (or any other sound for that matter), you’ll start losing low end energy instead of leaving breathing room for your kick. A cut of -3dB is usually enough, but trust your ears more than you trust us.
Remove Resonant Frequencies
Another useful way of using your EQ is taming resonant frequencies. What is resonance? It’s essentially like having different frequency points in your signal be at different volumes. The amplification that usually comes with resonance, can start to throw off the dynamics of your entire mix.
Furthermore, if you use compression on a channel with a lot of unwanted resonance, these frequencies will become even louder. Since compression brings out the tiny details in your signal, taming your resonance before compressing is key to a clean mix.
While you might want to have a resonant sound in some cases, it’s not necessarily what you want in a professional-sounding mix or master.
Resonance is usually divided by low frequency resonance and high frequency resonance. Low frequency resonance usually appears in the form of a hum, while high frequency resonance provides an irritating harshness (usually around 10kHz-15kHz).
To find resonant frequencies, you’ll need to use your ears. Discern, if your signal has unwanted resonance, if it does, you’ll need to sweep your EQ. Use a notch filter with a +10dB boost and solo it, so you’re only hearing the signal inside of the notch.
By adjusting the frequency cutoff of your filter, you’ll essentially sweep through the entire frequency spectrum, while listening for the resonance you’re trying to subdue.
Once you’ve found where the unwanted frequency is, just drop the gain of your filter to -3dB. Cut it more or less, based on how strong the resonance is.
Trusting your ears is key when working with resonance.
So you’ve successfully fixed the unwanted resonance, good job. Continue to do this for the rest of the unwanted resonance, and you’re well on your way to squeaky clean mixes.
TIP: Taming resonant frequencies is solely based on your listening ability, while there are tools that can help you with resonance (soothe2), training your ears to look out for these frequencies, is key to getting better.
Cleaning Up Low & High End
EQ is also great for cleaning up the low and high end of your mixes. Say your mix is sounding very muddy and washed out. Most likely, this is due to too much bass information.
Low end is always more difficult to balance. Since you’re most likely to keep all information below 150Hz in mono, any unwanted information below will just create mud, and you’ll lose clarity.
To prevent this use a low-cut filter to remove all unnecessary information in the low end, from all your channels that aren’t low end elements. Keep your bass and kick how it is, but drop a low cut at 150-200Hz on every other channel. This way, you’re making sure that the only low-end information you’re getting, is the one you actually want.
Same goes for the high-end of your frequency spectrum. Too much information in the very top end of your frequency spectrum, and you’re going to start introducing a lot of unwanted harshness in the high end.
Cutting high end frequencies is more finnicky than low ones. This is mostly due to the fact that, if you cut too much high end out of too many instruments, your entire mix will start to sound dark and muffled.
Which elements and how much you’re going to be cutting, depends entirely on your arrangement and instrumentation. We can’t say for sure that “you need to cut this much” but, just remember, too many cooks spoil the broth. Too many instruments taking up that presence range is just as bad as too little instruments occupying it.
As always in music, balance is key, and listening to your track while adapting to any necessary changes, is the only way you’re going to get better results.
Using Mid/Side For Peripheral Sound
We already talked about mid/side earlier, but solidifying the concepts of middle and side channels, is extremely important in mixing.
Think of the stereo field as your vision. While your eyes are mostly focusing on what’s front and center, your peripheral vision fills out the rest of your vision. Imagine if the only thing you could see was directly in front of you, it’d be horrible and disorienting, right?
Well, it’s the same for music. While most of your main focus elements need to be in the centre, the stuff that’s to the sides, is what makes an immersive experience.
Too many instruments hogging the center lane of your stereo field and you’re going to lose any sort of immersion, makes sense right? This is where Mid/Side comes in. Eq’ing your middle and side channels separately can help to sort out your stereo field.
For example, removing the entire low end up to 250Hz, will help to remove muddiness from your stereo field, making your low end more focused. alternatively, using a high shelf (on the side channel), can help to create more clarity in your stereo field, leading to better, more balanced mix.
Mid/Side is an extremely useful tool, and coming up with your own techniques is really fun.
Try utilizing mid/side more in your productions, and you’ll start to notice a definite improvement in your mixes.
Creative vs Corrective EQ


So how do we separate the two worlds of EQ, Creative vs Corrective? Putting it simply, creative EQ is more about shaping a sound, and changing it’s original sonic characteristics. Corrective EQ is about fixing a sound, whether it’s cleaning up the low-end, fixing resonances or changing the overall spectral balance.
As for Creative EQ, there are literally no rules you might need to follow, creative EQ is all about going wild, and creating new, unique things. If you follow any preset rules or guidelines, you’re never going to get a unique sound, which is why experimentation is key.
That being said, while you might accrue some Creative EQ techniques along the way, every time you’ll use creative EQ you’ll be using it differently. The way you’ll process your sound will be directly linked to what you’re starting with, and where you’re aiming to end up at.
So, if you’re shaping a sound, shape it the way you need to, not the way an EQ article suggests to.
Corrective EQ is different. While there is a certain degree of experimentation in corrective EQ, most of what you’ll be doing are the same few things.
- Resonance
- Balance
- Cleanup.
The changes you’ll be doing with corrective EQ will be much less drastic, than creative EQ. Usually, -3 to +3dB of attenuation is the limit of what you’ll be doing when correcting your audio.
This is the exact difference between Creative and Corrective. With Creative EQ, you’re doing boosts and cuts that are only limited by how much your EQ allows you to boost. With Corrective EQ, you’re only doing small corrections, while referencing the original constantly, not to change the entire sound, but to… correct it.
TIP: Cutting or Boosting frequencies in your EQ, will amount to a change in overall gain structure. Too many EQ boosts, and your signal might get too hot.
An Audio Spectrum Overview
20-40hz:
Edge of human range of unwanted rumble often completely removed.
40-80hz:
The sub-bass reproduces the “feel” of bass. It can add a low-end kick to the mix or it can overpower a small speaker.
80-250hz:
It is possible to boost or cut the bass from 100-200 Hz, which creates fullness or reduces boomy sounds as desired.
250-600hz:
In the kick drum, there is a cardboard box sound around 300-400 Hz. There is also some vocals and percussion to the beat.
600-4khz:
In the midrange, it is all too easy to add mud, because 800hz is the frequency where all the cheap sounds come from. 2k-4khz is where most percussion instruments are located, as well as some other instruments.
4-6khz:
There is a “presence” range that can help shape the vocal sound a great deal. It can provide a front-of-the-mix sound to vocals. And, if left too high these can be irritating. 7Khz: The unwelcome “s” hiss that cuts right through the mix.
8-20khz:
It is within this range that the term “air” or “brilliance” can be used, here is where you can add a sparkle to your sounds.
How To EQ Each Part of THe Frequency Spectrum
EQ’ing Low Rumble 20-40Hz
The lowest sound humans can hear is 20hz. 40hz is the upper limit of instruments. This range is where you will hear the rumble of a fighter jet or a monster truck. It’s where the rumble of an explosion can be heard or thunder etc.
In general, you mustn’t raise the frequencies of those sounds too much, as it often spoils the mix. It can totally ruin your mix and can make your song sound unclear, because of the overpowering frequencies washing over everything else.
To ensure that your bass is clean and not muddy, you should filter out 20-40Hz. This depends on your genre. If this genre relies heavily on bass, I would only suggest that filter to 20-30Hz.
The majority of systems will not be able to hear this frequency, but it is possible to hear it on systems intended for clubs and cinema theatres.
Make sure you are always listening to your tracks on a big system before playing them to a crowd because overpowering sub-bass can ruin the mix completely and drown everything else out. I have personal experience doing this when I was 17 and new to Music Production.
I had to quickly use the DJ decks to remove almost all of the bass for the track to be playable! (thankfully everyone was too drunk to notice)
EQ’ing Sub Bass 40-80Hz
The 40-80 HZ range belongs to the most audible sub-bass section. It’s an important range for hip-hop, dance, or electronic music.
This is the region you can use to send massive sonic booms through the dance floor.
Bass can be quite complicated. Most sound systems don’t reproduce very low notes well because of vicious frequency drop-offs. Even smaller speakers can’t reproduce them. Lots of speakers have a roll-off built into this region.
This is compounded by psychics.
Low-end frequency sounds aren’t heard as well as those in the high-frequency range at low volume. This is by design for human ears. It’s often recommended that you listen to songs on various and multiple sound systems but as well as listening to them loudly you should also listen to them at different volumes.
Even though all headphones vary in the way they reproduce different sounds, their qualities and characteristics are also important. Nevertheless, the transparent qualities of a monitor must also be kept in mind when EQing.
Even professional headphones with characteristically solid bass can lack lower-frequency support due to their hard diaphragms. The timbre and frequency range of mixing or mastering headphones can also differ significantly. You should only mix on headphones you truly know like the back of your hand.
This is why low-end systems need a bass boost, as well as subwoofers. Bass boost should subtly accentuate the bass, but not be too dramatic or overcompensate. Whenever possible, it is best to do some sound measurements to determine what is correct for your system.
You should boost the lower frequencies only (bass, kick).
Avoid boosting the midrange of other instruments too much or the sound will become muddy
Low Mid EQ’ing 100-600Hz
The boom of instruments can be heard at 100 Hz.
A cut at 100hz can be used to remove the boomy sound that guitars or other instruments sometimes produce when they are played.
Boosting a sound at 100 Hz can also add fullness to a thin sound by spreading it out. It can also help separate bass and guitar that blur together at 100 Hz.
In order to add fullness to vocals, 200hz-250hz can be added simultaneously, but it can also quickly muddy things up.
A reduction or boost in the mid-range can be helpful if you are looking for mud in vocals. However, changes within this range can become dramatic very quickly if they are made too large.
A slim acoustic guitar is often boosted in this range to fill out the thin sound, while the body of a snare and the gong sound of a cymbal is also common. This is also the region where the body of a snare can be heard, as well as the fullness of other acoustic instruments.
There is also some fullness for the vocals in the region between 250Hz-600Hz which lies on the borderlands between midrange and bass.
I would recommend cutting some of the frequencies around 300hz to 400hz if your kick drum or any other low-register percussion instrument has that icky cardboard box sound.
There is also a good chance that you can gain some space between the bassline and the bass drum in this same range.
Mid Range EQ’ing 600-4kHz
In the midrange, you will find frequencies between 600 and 4000 Hz.
Getting an unintended result in this range is easy, so proceed with subtlety in mind. In this range, it is easy to cause ear fatigue. It is important to be careful as the mid-range is also the range from which the most edgy and aggressive sound comes. However, you need to be cautious since the mid-range is a fine line between bliss and bleeding ears.
You can think of it as the telephone band.
If you create a step bell curve over these frequencies cut almost all the frequencies on either side and greatly boost most of the ones inside of the bell and you get the telephone sound.
This is the sound that is commonly referred to as cheap, plastic, tinny, toy sounding, and unmusical, and that is almost universally despised by people, is referred to by a host of negative terms, including Cheap, Plastic, Tinny, Toy Sounding, and Unmusical.
There is a frequency range of around 800hz where a bass guitar usually has a punchy tone, but most of the time it is reduced to remove the cheap sound in other instruments.
The area between two thousand and four thousand hertz above 800 Hz is where a percussion’s beater attack can be amplified or diminished depending on the tempo of the instrument being hit and the tempo of any other instrument being played.
In this range, there is a tendency for sounds to mix together a lot, so if you want everything to line up, you have to put lots of effort into it.
EQ’ing Stage Presence 4-6kHz
Usually when people talk about presence, they refer to frequencies between 4khz and 6khz as the ones that they are referring to
A guitar amp’s presence knob boosts these frequencies in order to make them louder.
In addition to affecting the sound close to the listener, these frequencies can also be used to separate it from the rest of the mix. It is also the range that makes vocals or instrument solos sound “up front.” It is also quite easy to abuse. In addition to becoming grating, too much booster will almost certainly result in listening fatigue.
There’s a great deal of sibilance in the air, so we’re EQing it at 7kHz!
This is a frequency range within which the sibilance or “s” sound is present, and it is within this range that you can reduce the unpleasant and sometimes overpowering “s” sounds. This process is called de-essing, and it can work wonders on your vocal track, but if applied too frequently it can destroy your vocal track.
It is important to be careful when using De-Essers or other tools, such as Oeksound Soothe, in this area, as if too much is applied, your vocalist might sound like they have a lisp!
Way Up High. EQ’ing 7-8kHz
A tone between 7K and 8K is usually referred to as shimmer or sizzle in music. It is often found in high-register percussion like cymbals and other percussion instruments.
Boosting in this area can yield a metallic sound when combined with other instruments, which can work well with other instruments.
EQ’ing Brilliance. To 8kHz and Beyond!
These “air” frequencies we refer to as air, brilliance, breath sound, or sparkle are often used by signal processors and audio engineers to deal with unpleasant sounds such as the ice pick sound or brittleness or to brighten up a sound and add some sparkle to it.
Adding some brilliance is something you can start with before looking at adding more. The area between 10k and 15k is more commonly referred to as “air.”
Alright alright, calm down you f*cking junkie, we’re here to help. We know it’s damn tempting to put your newfound EQ knowledge to good use.
Before you drop 3 EQ’s on your kick, you should consider some things first.
Think Objectively
Do you realistically need to use an EQ on that channel, or are you just dropping it on because you’re stuck, and want to pretend to be a professional engineer?
As with EQ techniques themselves, listening is key to figuring out the next step. Don’t start off every new audio channel with an EQ, rather think about what you’re trying to achieve with that EQ. If you can’t come up with a solid answer, don’t use an EQ.
If you hear some unwanted resonance, or a low-end rumble, of course, go ahead and drop that EQ on it and start hacking away. If you’re not correcting or shaping your sound however, what’s the point?
Don’t waste your time on unnecessary things, use EQ when it’s necessary, not when you’re stuck.
Use Your Ears
If you’ve been around any production circles or forums, you’ve probably heard the sentence “use your ears” more than most people. While it’s definitely overused, the advice couldn’t be closer to the truth.
With production, there’s no such thing as a steadfast rule, everything is subject to change. Interestingly enough, some of the best things come from breaking rules.
That being said, we know that this is like a financial advisor telling you to not follow his advice, but your ears are really the only thing you can rely on in the music world.
Especially with processes such as EQ or Compression, where most differences are felt rather than heard, trusting your instincts is key. If it sounds good, it sounds good, if it doesn’t, you’re doing something wrong, it’s that simple.
If everyone trusted their ears more than online articles, music would be so much more interesting than it is.
The only downside to all of this however is, your ears aren’t producing any sound, they’re just picking it up. By this we mean, what you’re hearing is entirely dependent on what you’re listening to it on. Phone speakers won’t produce as much low end as you want, and mixing on headphones can lead to a more claustrophobic sound than if you mix on speakers.
This being the case, referencing is the absolute key to creating a mix that translates well outside of your main listening environment.
For example, if you mix bass on headphones, it’ll sound way stronger on speakers and vice versa. Before finalizing a mix, or any EQ settings, consider referencing it on a different system. As valuable as precise studio monitors are, most people listen to music on cheap earbuds or phone speakers.
Making sure your mix translates well to lower end systems is the best way to make sure your music sounds the best it can, always.
It Isn’t Harry Potter’s Magic Wand
Lastly, after we’ve talked about how much you can achieve with an EQ, we need to point out that it’s not a magic wand. In fact, not much is, when we’re talking about production.
If your recording sucks, no amount of EQ will save it. You can definitely try to correct some unwanted noise, or resonance, but you can’t change a recording entirely.
Think of it this way, if you write with a pencil, and erase it, you still get the impression of what you’ve written on the paper. Same goes for EQ, while you can subdue any issues and correct them, you’re never going to be able to destroy every issue completely.
The key to good EQ, is a good recording. You can use EQ to make a great recording incredible, but you can’t make a crappy recording sound great. You can definitely make it better, but you’ll never fix your recording mistakes, with EQ.
That being the case, sometimes it just makes more sense, to re-record something, rather than trying your best to fix it. Overdoing your EQ, will just completely mess up the balance of your audio, and you’ll end up with a worse product than you started with.
But hey, if you’ve just been EQ’ing your drums for an hour, you probably don’t have context of what sounds good anymore, so why would you care?
Finishing Up
To recap: EQ or Equalization in music is the process of altering the balance of an entire sounds frequencies. Equalization is a vital process in mixing, think of it as the chisel of the sound world – you are the sculptor that can use it to shape your sound any way you like.
Now that we’ve run you through the do’s and don’ts of EQ, we hope you’ve gotten the concept of EQ in music production and how to use it, solidly in your head.
While it’s not a magic fixer-upper tool, it is one of your main tools as a producer. EQ will be your best friend, if you figure out how to best use it. If you don’t, and just EQ based on some data sheets, it can be your worst enemy.
So that leads us to the finale, the end-point of this article, I hope you learned something along the way. If you didn’t, you should probably be making music rather than reading articles like this. Furthermore, you can check out SplitEQ Review – it gives you the ability to boost or cut the frequency range separately.
Want to read more helpful articles about music production?
Toms is a music producer & DJ, born and raised in Post Soviet Latvia. Currently based in Brighton, Toms has had over 6 years of experience with all things production and in that time, he’s done a tonne of cool stuff! He’s played multiple festivals, had experience in the field with mixing & mastering and even become a freelance journalist in the music industry.
Toms currently creates music under the alias Sovereign. Producing music that’s intimate and subtle, while full of edge and energy, the young producer combines the artistic sounds of Trip Hop artists like Massive Attack, with the energy and youthfulness of producers like Flume, Jamie XX and Yaeji. You can check his stuff on Soundcloud.


